How to Establish a Local Manufacturing Facility

During

Have you secured the time and resources to undertake a proper facility design? Here are a few important considerations to integrate into your plans.

Designing your Facility for a compelling Business Case

Equipped with a proven and well-selling product, and armed with the necessary design and development funding, designing a manufacturing plant can be an exciting yet challenging endeavour. It requires thorough, detailed planning with a long-term perspective, making it both time-consuming and costly.

This rigour is necessary to compile a compelling and robust business case that will attract funders and secure the funders you need.

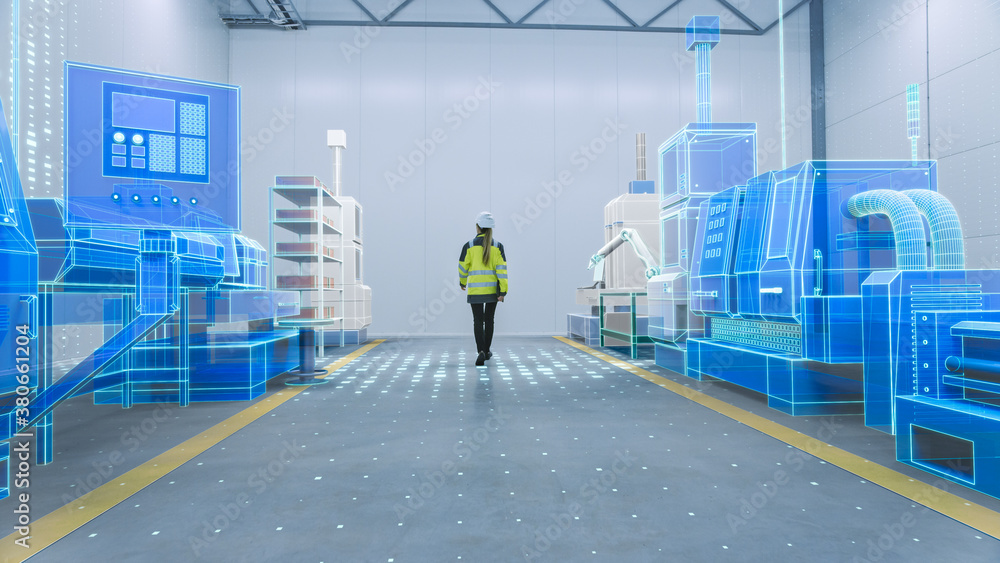
Furthermore, funders need to visualize what they are investing in, which is challenging for a new build. However, design drawings, 3-D renderings, and flow charts can significantly aid in this visualization. Therefore, it is wise to complete your design before approaching potential funders.

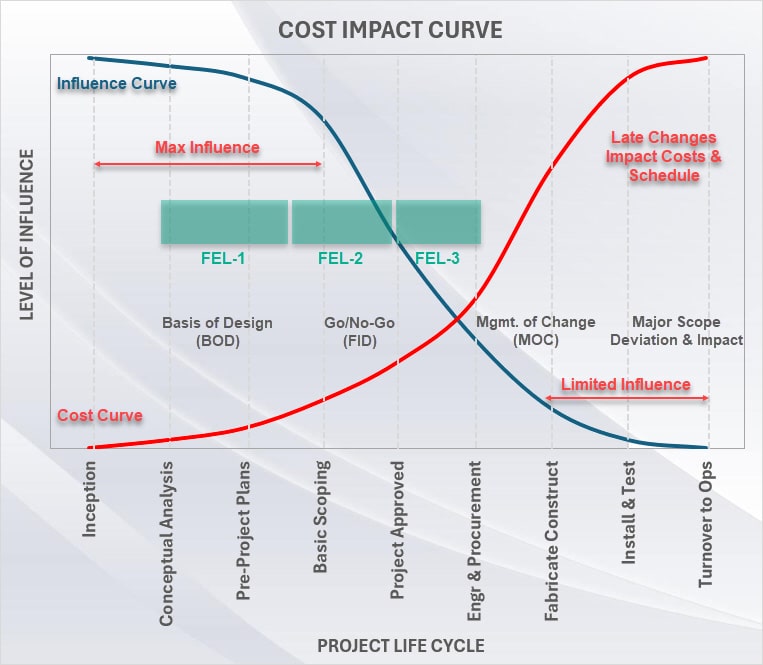
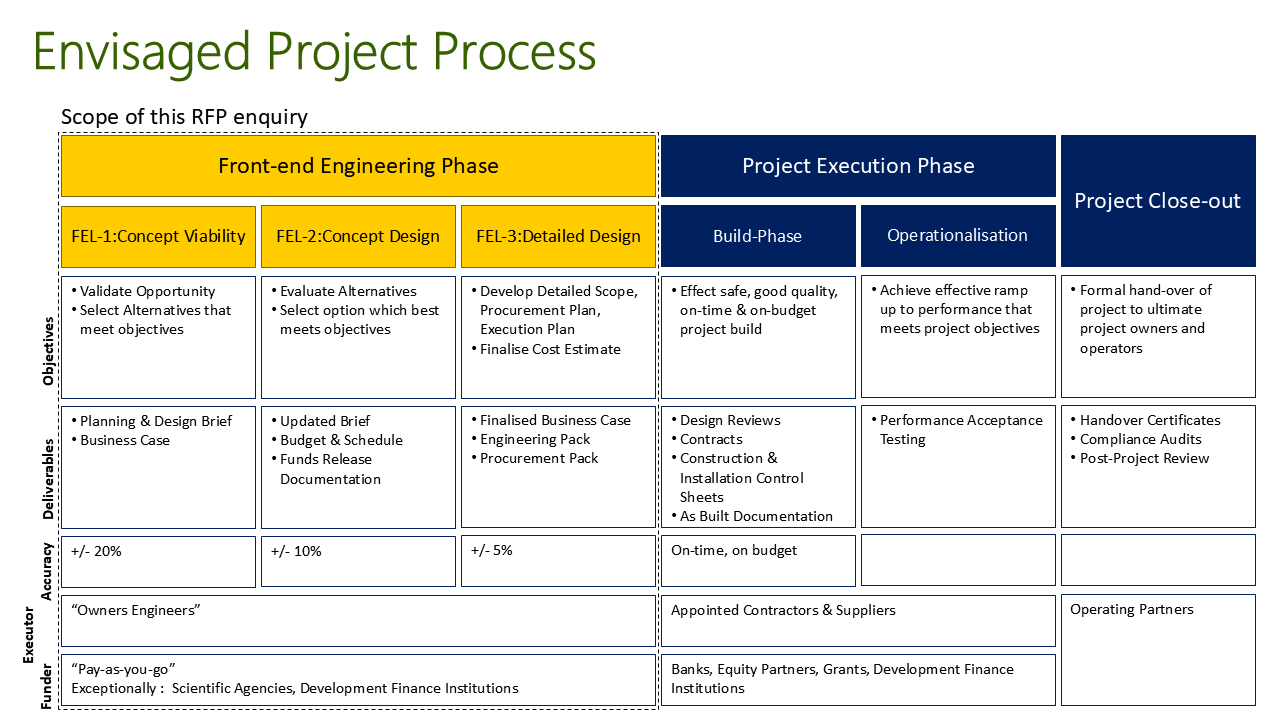
A methodical project management process assures funders that the best option has been selected from a range of viable alternatives and that sufficient design time and planning have been undertaken to minimize costly late-stage changes and oversights.

click to hide/show details...

Local Manufacturing Brief

It is critical to be clear on why you are about to embark on designing and establishing a local manufacturing facility. Writing a design brief is an important step in clarifying your thoughts regarding your overall rationale, and what you seek to achieve by embarking on this project.

The brief must evolve as a living document as you go through all the steps of designing your facility. This process is innately iterative, and the document will help you work through the implications of what you learn is and what is not possible to achieve.

Purpose & Rationale

Clearly define why you are embarking on this project and what you aim to achieve. The brief should help you articulate your rationale and objectives.

Considerations

Ensure the brief addresses these key questions:

  • Why do you seek to establish a local manufacturing facility?
  • What will define success for your facility?
  • What will the facility produce?
  • What exactly will the facility do?
  • What will the facility not do?
  • What constraints exist for the facility?
  • What degrees of freedom does the design process still retain?
  • Where is the ideal location for the facility?
  • And how much space will you have vs what you need?
  • How will things be done? By people or by machine?
  • How skilled will the people need to be?
  • Who will do everything else that needs to be done?
  • What can you afford to spend on the facility?
  • What quantity of product will be produced there? When your start? And Ultimately?
  • What are the Key Performance Indicators (KPIs), and what is the target level for each metric that the facility is being designed to achieve?

Process Steps

These are the key steps you should take to prepare the brief:

  1. Download and complete the template.
  2. Have colleagues, trusted advisers review the document.
  3. Use the updated project brief in all initial meetings to ensure third parties assisting in the design are aligned.
  4. Cross check that all designs are consistent with the Project Brief parameters, key performance indicators and deliver the objectives.

Quality Indicators

A robust document will exhibit the following qualities:

  • Few questions remain when you present the document.
  • You find yourself reverting to the document to explain your objectives & how you plan to undertake the design.
  • You find yourself updating the document as key decisions are made, constraints are uncovered, and new possibilities emerge.
click to hide/show details...

Stage-Gate Process

The "Stage-gate" Process is a well-known project management framework defined to manage development projects and authorise projects to progress under specific conditions at defined stage-gates. This process is especially effective for managing a portfolio of Product Development Projects, and typically in a scenario where it is important to prioritise projects and products with a greater prospect of success.

The framework is particularly useful for management of many of the Major Themes we discussed under the "Before" you consider establishing a Local Manufacturing Facility.

The section Front-End Engineering is more comprehensive and tailored for projects such as the design and construction of a Manufacturing Facility.

Purpose & Rationale

The Stage-Gate Process is a well-known project management framework designed to manage development projects and authorise projects to progress under specific conditions at defined stage-gates. This process is especially effective for managing a portfolio of Product Development Projects, prioritising projects and products with a greater prospect of success.

What are Stage Gates

A Stage-Gate is a step at the end of a development stage, where a management team makes a decision on whether to allow a project through the "Gate" to the next development stage. The criteria for passing through the gate depend on each stage, but generally all are related to the quantum of the Opportunity (Business Case), and the probability of success.

Stages

Discovery

This initial stage involves generating and capturing new product ideas. It includes brainstorming sessions, market research, and identifying potential opportunities.

Scoping

In this stage, a preliminary assessment of the project's feasibility is conducted. This includes a quick evaluation of the market potential, technical feasibility, and alignment with business objectives.

Business Case Development

A detailed business case is developed, including market analysis, technical specifications, financial projections, and risk assessment. This stage aims to justify the investment in the project.

Development

The actual design and development of the product take place in this stage. Prototypes are created, and the product design is refined based on testing and feedback.

Testing and Validation

The product undergoes rigorous testing to ensure it meets the required standards and specifications. This includes both internal testing and external validation with potential customers.

Launch

The final product is introduced to the market. This stage involves production ramp-up, marketing, sales, and distribution activities.

Stock Photo

Key Question

What criteria must be met for a project to pass through each stage gate and progress to the next development stage?

Considerations

  • What is the quantum of the Opportunity (Business Case)?
  • What is the probability of success at each stage?
  • How does the project align with business objectives?
  • What are the technical and market feasibility assessments?
  • What are the financial projections and risk assessments?

Information Required

  • Market research data
  • Technical feasibility studies
  • Financial projections
  • Risk assessment reports
  • Stakeholder inputs

Quality Requirements

  • Comprehensive documentation of each stage.
  • Clear criteria for passing through each stage gate.
  • Regular reviews and updates based on feedback and testing.
  • Alignment with business objectives and strategic goals.
  • Effective risk management and mitigation strategies.
click to hide/show details...

Front End Engineering

Front-End Engineering (also known as Front End Loading) is a form of a "Stage-Gate" Process, but it is more comprehensive and tailored for projects involving the design and construction of production facilities such as that for a Manufacturing Facility.

The Front-End Engineering process is advocated by the Project Management Institute on the basis that effective engineering design early in the process before major decisions are made have the greatest impact on the success of the project. , as time and a project progress more and more decision are made and money committed. Hence engineering choices become significantly more costly to change.

Purpose and Rationale

The Front-End Engineering (FEL) process is crucial for the successful design and construction of manufacturing facilities. This process, advocated by the Project Management Institute, emphasizes the importance of making effective engineering decisions early in the project lifecycle. By focusing on detailed planning and design before major decisions are made, the FEL process helps to:

Stock Photo
  • Maximise Project Success: Early engineering design has the greatest impact on the project's success, reducing the risk of costly changes and oversights later in the project.
  • Optimise Resource Allocation: Thorough planning ensures that resources are used efficiently, minimizing waste and maximising value.
  • Enhance Decision-Making: By evaluating all technical and commercial alternatives, the FEL process ensures that the best possible solutions are selected.
  • Improve Cost Accuracy: Detailed design and budget estimates provide a more accurate financial picture, helping to secure funding and manage costs effectively.
  • Mitigate Risks: Identifying and addressing potential risks early in the project reduces uncertainties and enhances overall project stability.

FEL Stages

he FEL process is divided into three stages: Concept Viability (FEL-1), Conceptual Design (FEL-2), and Detailed Design (FEL-3). Each stage builds upon the previous one, ensuring a comprehensive and methodical approach to facility design.

FEL-1: Concept Viability

FEL-1 entails high level analysis of whether the project is likely to be viable. It sends to be more commercial, than technical and uses an "inaccurate" cost estimate of >20% accuracy to get some handle on the project financial parameters of IRR, NPV, etc. it is in effect the first version of the business case, often with optimistic assumptions.

FEL-2: Conceptual Design

This stage looks into all of the technical alternatives to achieve the aims of the project. It is a deliberate process to find the best technical solution for the opportunity. The alternatives are developed technically and commercially with as much information as can be garnered until a side-by-side evaluation yields a clear shortlist of viable alternatives, one of which is hopefully a clear viable front-runner.

FEL-3: Detailed Design

The "shortlist" of viable alternatives is engineered to the point that the equipment can be procured. At this point detailed budget estimates are gathered and technical specifications sufficiently detailed to improve the business case accuracy. At the end of this stage, it is possible to formally go to market with the intention of contracting suppliers and procuring equipment.

The following is an exhibit of the project management process employed by the LSF in a recent project:
Stock Photo

Key Question

What are the critical engineering decisions that need to be made early in the project to ensure its success?

Considerations

  • What is the commercial viability of the project?
  • What are the best technical solutions for the opportunity?
  • How accurate are the cost estimates?
  • What are the potential risks and uncertainties?
  • How will the project be funded and what are the financial implications?

Information Required

  • High-level analysis of project viability
  • Technical alternatives and evaluations
  • Detailed budget estimates
  • Technical specifications
  • Business case accuracy

Process Steps

  1. Concept Viability (FEL-1): Conduct high-level analysis to determine if the project is likely to be viable, focusing on commercial aspects and using an initial cost estimate.
  2. Conceptual Design (FEL-2): Explore all technical alternatives to achieve the project's aims, developing them technically and commercially until a clear shortlist of viable options is identified.
  3. Detailed Design (FEL-3): Engineer the shortlisted alternatives to the point where equipment can be procured, gathering detailed budget estimates and technical specifications to improve business case accuracy.

Quality Requirements

  • Comprehensive documentation of each stage.
  • Clear criteria for passing through each stage gate.
  • Regular reviews and updates based on feedback and testing.
  • Alignment with business objectives and strategic goals.
  • Effective risk management and mitigation strategies.
click to hide/show details...

Standard Operating Procedures

The Manufacturing Process Documentation, also known as "Standard Operating Procedures", is like the recipe book for the facility' products. Without a reliable proven recipe, the outcome of the manufacturing process is likely to be variable and hence the product quality will be poor.

This process will dictate what machinery is required, and what space is required for process steps that you decide remain manual. This information, coupled with quantities to be produced, assist the process engineers in specifying the type and size of equipment required.

Purpose & Rationale

The Standard Operating Procedures (SOPs) are essential for ensuring consistent and high-quality outcomes in our manufacturing processes. They serve as detailed guidelines that outline the necessary steps, conditions, and responsibilities for each stage of production. By adhering to these procedures, we can minimize variability, enhance efficiency, and maintain the integrity of our products. SOPs also provide a framework for training personnel, troubleshooting issues, and documenting process performance, thereby supporting continuous improvement and compliance with industry standards.

Considerations

The Standard Operating Procedure should answer inter-alia the following questions for each product:

  • What raw materials and utilities are required and in what quantity --> Bill of Materials
  • For each step, in sequence, how is each material introduced, in what quantity or rate, and under what conditions of temperature, time, pressure (etc.)?
  • What are the acceptable range of process conditions for adequate quality to be assured?
  • Who is responsible for each step in the process?
  • How is Quality measured, assessed and ensured?
  • What does one do when errors are made or deviations in quality are detected?
  • What record keeping is required for quality, quantity, yield and performance efficiency tracking to be monitored?
  • How do you start the process?
  • How do you stop the process?

Document Structure & Information Required

  1. Title and Purpose: Clearly state the title of the document and its purpose. This helps users understand the scope and importance of the procedure.
  2. Scope: Define the boundaries of the process, including what is covered and what is not. This section helps to clarify the extent of the procedure.
  3. Responsibilities: List the roles and responsibilities of personnel involved in the process. This ensures accountability and clarity on who is responsible for each step.
  4. Materials and Equipment: Detail the materials, tools, and equipment required to perform the process. This helps in preparation and ensures that all necessary resources are available.
    • Bills of Materials
    • Material Data Sheets
    • Equipment & machinery specifications
  5. Procedure: Provide a step-by-step description of the process. Each step should be detailed and include any specific instructions, safety precautions, and quality checks. Visual aids like flowcharts or diagrams can be very helpful here.
    1. Step 1: ...
    2. Step 2: ...
    3. Step ...
  6. Quality Control: Outline the quality control measures and checkpoints within the process. This ensures that the final product meets the required standards.
  7. Safety Considerations: Include any safety precautions and personal protective equipment (PPE) required. This section helps to ensure the safety of personnel.
  8. Documentation and Records: Specify the documentation and records that need to be maintained. This helps in tracking and auditing the process.
  9. References: List any related documents, standards, or regulations that are relevant to the process. This provides additional context and guidance.
  10. Revision History: Include a section that tracks changes to the document over time. This helps in maintaining an up-to-date and accurate procedure.

Process Steps

The brief should answer inter-alia the following questions:

  1. Download and complete the template.
  2. Have colleagues, trusted advisers review the document.
  3. Use the updated project brief in all initial meetings to ensure third parties assisting in the design are aligned.

Quality Indicators

You will know each procedure is robust when:

  • Few questions remain when you present the document.
  • You find yourself reverting to the document to explain your objectives & how you plan to undertake the design.
  • You find yourself updating the document as key decisions are made, constraints are uncovered, and new possibilities emerge.
click to hide/show details...

Manufacturing Capability

The Manufacturing Process Documentation comprises as series of individual Operating Procedures and or recipes. However, it is inefficient to have dedicated production equipment and teams for specific products. Most often "recipes" share common equipment, ingredients and skills to prepare the dish.

In order to be able to exploit potential economies of scale and other production efficiencies, it is important to methodically go through the Manufacturing Processes documentation to identify these common capabilities which could be aggregated across many products. This analysis then informs the final processes, procedures, equipment, material and people flows to be used for your design.

Purpose & Rationale

The Manufacturing Capability section aims to provide a comprehensive overview of the processes, equipment, and skills required to efficiently produce a range of products within a manufacturing facility. This section is crucial for identifying common capabilities that can be leveraged across multiple product lines, thereby optimizing production efficiency and reducing costs.

Purpose:

  • Optimise Production Efficiency: By identifying and aggregating common process steps, equipment, and skills, we can streamline operations and achieve economies of scale.
  • Enhance Flexibility: Understanding shared capabilities allows for easier adaptation to changes in product demand and production requirements.
  • Improve Resource Utilization: Efficiently utilizing shared resources reduces waste and maximizes the use of available equipment and personnel.

Rationale:

  • Economies of Scale: Aggregating common capabilities across product lines can significantly reduce production costs and improve overall efficiency.
  • Late-Stage Differentiation: By producing a common product base and differentiating products at later stages, we can enhance flexibility and responsiveness to market demands.
  • Confidence in Intermediate Products: Ensuring the quality and reliability of intermediate products supports consistent final product output and reduces the need for extensive stockholding.

Considerations

The brief should answer inter-alia the following questions:

  • What process steps are similar across the range of products to be produced in the facility?
  • Can common equipment and people be shared across the product lines?
  • Can you identify common intermediate work in process products that can be shared between products and or stored?
  • Are there economies of scale to be drawn in producing a common product base or platform, and then only finishing-off each different product at the final stages of the procedure (late-stage differentiation).
  • What confidence do you have in the intermediate product offtake? How does this impact the amount of stock that needs to be held?
  • How do the above change the product processes & procedures defined previously?
  • Are any products (final or intermediate) sufficiently large to warrant larger batch sizes or even continuous processes?
  • How does this change the overall production processes?

Information Required & Produced

  1. Raw Material Specification Sheets
  2. Bills of Materials
  3. Recipes
  4. Product & Material Specification Sheets
  5. Process Flow Diagrams

Process Steps

These are the steps you should undertake to prepare the documentation:

  1. Compile a list of all raw materials and quantities; aggregate similar materials into categories.
  2. Compile a list of all process steps; aggregate similar steps into categories.
  3. Cross tabulate the categories of materials and process steps with products (& quantities) to aggregate totals.

Quality Indicators

You will know the document is robust when:

  • Few questions remain when you present the document.
  • You find yourself reverting to the document to explain your objectives & how you plan to undertake the design.
  • You find yourself updating the document as key decisions are made, constraints are uncovered, and new possibilities emerge.
click to hide/show details...

Material & People Flows

Material flow involves the movement of raw materials, work-in-progress items, and finished products through various stages of production. Efficient material flow ensures that materials are available where and when needed, reducing delays and inventory costs, minimizing handling and transportation, cutting down waste, and improving product quality.

People flow refers to the efficient movement of personnel within the facility. This enhances productivity, reduces the risk of accidents, and improves communication and collaboration, leading to better problem-solving and innovation.

Both material and people flows are crucial for optimizing productivity, ensuring safety, and minimizing costs within a facility.

Purpose & Rationale

In the design of manufacturing facilities, the efficient flow of both people and materials is crucial for optimizing productivity, ensuring safety, and minimizing costs. The primary purpose of these flows is to streamline operations, reduce bottlenecks, and enhance the overall efficiency of the manufacturing process.

Material Flow involves the movement of raw materials, work-in-progress items, and finished products through various stages of production. Effective material flow ensures that materials are available where and when they are needed, reducing delays and inventory costs. It also minimizes the handling and transportation of materials, which can significantly cut down on waste and improve the quality of the final product.

  • Raw Materials
  • Work in Progress
  • Finished Goods
  • Consumables
  • Re-work
  • Waste

People Flows: The movement of personnel within the facility is equally important. Efficient people flow ensures that workers can perform their tasks without unnecessary movement or interference, which enhances productivity and reduces the risk of accidents. Properly designed pathways and workstations can also improve communication and collaboration among employees, leading to better problem-solving and innovation.

  • Operators
  • Maintenance Crews
  • Forklifts & Pallet Jacks

Design Principles

these are important principles to designing people and material flows:

  • Minimise Movement: Sequence equipment and workstations to reduce the distance materials need to travel. This minimizes handling time and reduces the risk of damage.
  • Simple Straight Flows: Materials should flow smoothly from Receiving to Finished Products - separate inbound and outbound logisitcs.
  • Eliminate Crossovers: Pathways for materials should rarely cross-over, and never at the same level.
  • Work Cells: Process stages with significant human intervention should be collocated in logical modes, with easy access and egress for humans, tools, and other operating materials.
    • Visual Management: machinery with a greater probability of causing backlogs should be highly visible and accessible.
    • Lean Manufacturing: Apply lean manufacturing Principles to maximise efficiency and minimise waste.
    • Autonomous Maintenance: Operators should be able to proactively intervene and prevent breakdowns, as well as being undertake simpler repairs.
    • Asset Management & Preventative Maintenance: Maintain equipment proactively to avoid breakdowns and quality losses, which typically are more costly than premature replacement of wearing parts.
  • V-Profile:
  • Sufficient Buffer: Provide for accumulation between process areas to minimise stopping & starting. Storage should not impede flows.
  • Flexibility: Where uncertainty exists, design-in flexibility in advance.
  • Address & Eliminate Rework: Rework is sometimes unavoidable.
  • Access and Egress: time and motion studies should inform corridor widths.

Process Steps

The brief should answer inter-alia the following questions:

  1. Download the template.
  2. Complete the template.
  3. Have colleagues, trusted advisers review the document.
  4. Use the updated project brief in all initial meetings to ensure third parties assisting in the design are aligned.

Quality Indicators

You will know the document is robust when:

  • All potential bottle necks have been identified and mitigated.
click to hide/show details...

Space Planning & Optimisation

Effective space planning and optimization are critical for maximising efficiency, safety, and productivity in a manufacturing facility. This involves organizing the physical arrangement of equipment, workstations, and storage areas to streamline workflows, reduce production times, and minimize costs.

Flow planning is just the preliminary step in concluding the layout of a site. Flow Planning is unconstrained in many regards. But as soon as practicalities are considered, like how much space is available, and can one afford to build more, the layout must be finalised within these practical considerations. This is a process of prioritisation and compromise.

Purpose & Rationale

Effective space planning and optimization are critical components in the design of a manufacturing facility. The primary purpose of space planning is to create a layout that maximizes efficiency, safety, and productivity. By carefully organizing the physical arrangement of equipment, workstations, and storage areas, manufacturers can streamline workflows, reduce production times, and minimize costs.

Space optimization ensures that every square meter of the facility is utilized effectively, accommodating current operations while allowing for future growth and flexibility. This involves not only the strategic placement of machinery and materials but also the integration of advanced technologies and automation systems to enhance operational efficiency.

Moreover, a well-designed layout prioritizes safety and compliance with industry regulations, providing a secure environment for employees and reducing the risk of accidents. It also considers environmental sustainability, incorporating practices that minimize waste and energy consumption.

Purpose

The primary purpose of space planning is to create a layout that maximizes operational efficiency, safety, and productivity. This includes strategic placement of machinery, materials, and integration of advanced technologies to enhance overall performance.

Rationale

Space optimization ensures that every square meter of the facility is utilised effectively, accommodating current operations while allowing for future growth and flexibility. It prioritises safety, compliance with industry regulations, and environmental sustainability.

Key Questions

  • How much space is available or can the business afford?
  • Are the flows of people and materials optimized in all key operating scenarios (e.g., start-up, normal operations, shift change)?
  • What space is reserved for future manufacturing lines and capacity?
  • Where are raw materials received and stored?
  • Where are finished goods placed after production and before outbound logistics?
  • Is product stored on-site or at another location?

Considerations

The space layouts should answer inter-alia the following questions:

  • How much space is available? or can the business afford?
  • what are the typical plot / erven shapes and sizes in the areas you are considering locating the plant?
  • Are the flows of people and materials optimised in all key operating scenarios?
    • Start-up
    • Normal Operations
    • Shift Change
    • Product Change Overs
    • Shutdown
    • Cleaning
    • Maintenance
    • Breakdowns
  • What space is reserved for future manufacturing lines and capacity?
  • Where are raw materials received and stored for use later?
  • Where are finished goods placed after production and before outbound logistics?
  • Is product stored on site or at another location?
  • ...

Information Required

  • Space requirements for each area.
  • Physical dimensions and structural elements.
  • Zoning plans.
  • Workflow diagrams.
  • Pathway and circulation plans.
  • Design elements and materials.
  • Flexibility and scalability plans.
  • Space utilization metrics.
  • Support area requirements.
  • Technology integration plans.
  • Safety and compliance documentation.
  • Environmental impact assessments.

Document Structure & Information Required

  1. Needs Assessment: Understanding the requirements and goals of the space, including the activities that will take place and the number of people using it.
  2. Space Analysis: Evaluating the physical dimensions, structural elements, and existing conditions of the space. This includes considering factors like natural light, ventilation, and accessibility.
  3. Zoning: Dividing the space into different zones based on their intended use. For example, in a factory, this might include receiving, stores, production, finished goods and administration.
  4. Workflow Optimization: Designing the layout to ensure a smooth and efficient flow of materials, products, and personnel. This minimizes movement and handling, reducing production time and costs1.
  5. Flow and Circulation: Ensuring that there is a logical and efficient flow of movement within the space. This involves planning pathways and ensuring that there are no obstructions.
  6. Aesthetics and Design: Incorporating design elements that enhance the visual appeal of the space. This includes selecting colours, materials, and finishes that align with the overall design concept.
  7. Flexibility and Scalability: Designing the facility to be adaptable to changes in production processes, product lines, and future expansion. This might involve modular layouts that can be easily reconfigured.
  8. Space Utilization: Making the best use of available space to accommodate equipment, workstations, storage areas, and pathways. This includes considering vertical space for storage and equipment2.
  9. Support Areas: Allocating space for support functions such as quality control, maintenance, administrative offices, and employee amenities. These areas are essential for the smooth operation of the facility2.
  10. Technology Integration: Incorporating advanced manufacturing technologies and automation into the layout. This includes planning for the installation of robotics, conveyor systems, and other automated equipment3.
  11. Safety and Compliance: Ensuring the layout meets safety standards and regulations. This includes providing adequate space for emergency exits, fire safety equipment, and ensuring safe distances between machinery, accessibility, and environmental sustainability.
  12. Environmental Considerations: Designing the facility to minimize environmental impact. This includes efficient use of energy, waste management, and incorporating sustainable practices1.

Process Steps

The brief should answer inter-alia the following questions:

  1. Collect space requirements for each
  2. Complete the template.
  3. Have colleagues, trusted advisers review the document.
  4. Use the updated project brief in all initial meetings to ensure third parties assisting in the design are aligned.

Quality Indicators

You will know the layout is robust when:

  • Few questions remain when you present the document.
  • You find yourself reverting to the document to explain your objectives & how you plan to undertake the design.
  • You find yourself updating the document as key decisions are made, constraints are uncovered, and new possibilities emerge.
click to hide/show details...

Cost Estimation

Accurate cost estimations are crucial for budgeting and financial planning in space planning and optimization projects. This section outlines the key components and methodologies for estimating costs effectively.

Purpose

The purpose of cost estimations is to provide a detailed financial overview of the project, ensuring that all expenses are accounted for and that the project remains within budget.

Rationale

Cost estimations help in identifying potential financial risks and opportunities, allowing for better decision-making and resource allocation. They ensure that the project is financially viable and sustainable.

Key Questions

  • What are the initial setup costs, including equipment and infrastructure?
  • What are the ongoing operational costs, such as maintenance and utilities?
  • Are there any hidden costs or contingencies that need to be considered?
  • How will cost fluctuations in materials and labour impact the budget?
  • What are the costs associated with technology integration and upgrades?
  • How can cost savings be achieved through efficient space utilization?

Considerations

  • What are the major cost components of the project?
  • How accurate are the cost estimates?
  • What are the potential risks and uncertainties affecting the cost?
  • How will the costs be monitored and controlled?

Document Structure & Information Required

  • Title and Purpose: Clearly state the title of the document and its purpose.
  • Scope: Define the boundaries of the cost estimate, including what is covered and what is not.
  • Cost Breakdown: Provide a detailed breakdown of the costs, including materials, labour, equipment, and other expenses.
  • Contingency: Include a contingency amount to cover unexpected costs.
  • Assumptions: List any assumptions made in the cost estimate.
  • References: Include any references or sources used in preparing the cost estimate.

Documentation Structure

  1. Needs Assessment

    Understanding the requirements and goals of the space. Activities and number of people using the space.

  2. Space Analysis

    Evaluating physical dimensions, structural elements, and existing conditions. Considering factors like natural light, ventilation, and accessibility.

  3. Zoning

    Dividing the space into different zones based on their intended use.

  4. Workflow Optimization

    Designing the layout to ensure smooth and efficient flow of materials, products, and personnel.

  5. Flow and Circulation

    Planning pathways and ensuring there are no obstructions.

  6. Aesthetics and Design

    Incorporating design elements that enhance the visual appeal of the space.

  7. Flexibility and Scalability

    Designing the facility to be adaptable to changes in production processes and future expansion.

  8. Space Utilization

    Making the best use of available space for equipment, workstations, storage areas, and pathways.

  9. Support Areas

    Allocating space for quality control, maintenance, administrative offices, and employee amenities.

  10. Technology Integration

    Incorporating advanced manufacturing technologies and automation into the layout.

  11. Safety and Compliance

    Ensuring the layout meets safety standards and regulations.

  12. Environmental Considerations

    Designing the facility to minimize environmental impact.

Information Required

  • Space requirements for each area.
  • Physical dimensions and structural elements.
  • Zoning plans.
  • Workflow diagrams.
  • Pathway and circulation plans.
  • Design elements and materials.
  • Flexibility and scalability plans.
  • Space utilization metrics.
  • Support area requirements.
  • Technology integration plans.
  • Safety and compliance documentation.
  • Environmental impact assessments.

Process Steps

  1. Gather all relevant cost data and information.
  2. Prepare a detailed cost breakdown.
  3. Review the cost estimate with colleagues and trusted advisers.
  4. Update the cost estimate as new information becomes available.

Quality Indicators

  • Few questions remain when you present the document.
  • You find yourself reverting to the document to explain your objectives and how you plan to manage the costs.
  • You find yourself updating the document as key decisions are made, constraints are uncovered, and new possibilities emerge.
click to hide/show details...

Business Case

The business case is a critical document that outlines the justification for the project. It provides a detailed analysis of the benefits, costs, risks, and opportunities associated with the project, helping stakeholders make informed decisions.

Purpose & Rationale

The purpose of the business case is to present a compelling argument for the project. It aims to demonstrate the project's value and feasibility, ensuring that it aligns with the organization's strategic objectives and delivers a positive return on investment.

Considerations

  • What are the key benefits of the project?
  • What are the estimated costs and how accurate are these estimates?
  • What risks and uncertainties could impact the project?
  • How will the project be funded and what are the financial implications?

Document Structure & Information Required

  • Title and Purpose: Clearly state the title of the document and its purpose.
  • Executive Summary: Provide a brief overview of the project, including its objectives, benefits, and key considerations.
  • Project Description: Detail the project's scope, deliverables, and timeline.
  • Cost-Benefit Analysis: Present a detailed analysis of the project's costs and benefits, including financial projections and return on investment.
  • Risk Assessment: Identify potential risks and uncertainties, and outline mitigation strategies.
  • Funding Plan: Describe how the project will be funded, including sources of funding and financial implications.
  • Conclusion: Summarize the key points and provide a recommendation for proceeding with the project.

Process Steps

  1. Gather all relevant data and information.
  2. Prepare a detailed cost-benefit analysis.
  3. Review the business case with colleagues and trusted advisers.
  4. Update the business case as new information becomes available.

Quality Indicators

  • Few questions remain when you present the document.
  • You find yourself reverting to the document to explain your objectives and how you plan to manage the project.
  • You find yourself updating the document as key decisions are made, constraints are uncovered, and new possibilities emerge.
click to hide/show details...

Project Execution Approach & Strategy

The Project Execution Approach & Strategy section outlines the methodologies and strategies that will be employed to ensure the successful completion of the project. This includes the overall execution plan, resource allocation, and risk management strategies.

Purpose and Rationale

The purpose of this section is to provide a clear and structured approach to project execution, ensuring that all activities are aligned with the project objectives. It helps in coordinating efforts, managing resources efficiently, and mitigating risks to achieve project success.

Project Strategies (EPC versus EPCM)

Aspect EPC Contracts EPCM Contracts
Definition Turnkey contracts where the contractor is responsible for engineering, procurement, and construction, delivering a complete facility to the owner. Contracts where the contractor manages the engineering, procurement, and construction processes, but the owner retains more control and responsibility.
Pros
  • Single point of responsibility
  • Fixed price and schedule
  • Reduced risk for the owner
  • Streamlined communication
  • Greater flexibility for the owner
  • Potential cost savings
  • Owner retains control over design and procurement
  • Better adaptability to changes
Cons
  • Higher initial cost
  • Less control for the owner
  • Potential for contractor disputes
  • Limited flexibility for changes
  • More complex management
  • Higher risk for the owner
  • Potential for cost overruns
  • Requires more owner involvement
Risk Allocation Contractor assumes most of the risk. Owner assumes more risk, especially related to cost and schedule.
Cost Control Fixed price provides better cost control. Potential for better cost savings but higher risk of overruns.
Flexibility Less flexible; changes can be costly. More flexible; easier to implement changes.

Contract Types

It is important to decide how you would like to manage the project. Since building a Manufacturing Facility entails so much work, you will have to rely on others to undertake the work required. How you agree a contract with these people and companies will affect how much you will have to pay. The contract types come at different costs, based on what the contracting entity will and will not pay for and how they set the price for the work and goods.

Cheapest is not always best in such instances since cheaper contracts have more exclusions, or higher premiums on changes to scope later.

Fixed-Price Contracts (FP)

These contracts have a set price that does not change regardless of the actual costs incurred. They are suitable for projects with well-defined scopes.

Fixed Price Contracts are typically more expensive, as the contractor assumes some risk for the costs incurred in changes later. But since the contractor carries incentive to get the work done within their quotation, they work hard to complete the project on time and in budget. The quality of workmanship must however be carefully managed, as there is an incentive to "cut corners".

  • Pros: Predictable costs, less financial risk for the buyer.
  • Cons: Less flexibility, potential for disputes if scope changes.

Time and Materials Contracts (T&M)

The buyer pays for the actual time spent by the contractor and the materials used. These contracts are ideal for projects with uncertain scopes. The contractor often includes mark-up in the costs of the materials, and thus sometimes the materials could be purchased cheaper directly from suppliers. These projects are prone to "scope-creep" as the full costings are rarely done ahead of timing, and mistakes still need to be paid for.

  • Pros: Flexibility, suitable for projects with uncertain scope.
  • Cons: Less cost control, higher financial risk for the buyer.

Cost-Reimbursable Contracts (CR)

The buyer reimburses the contractor for all legitimate costs incurred, plus an additional fee or profit. These contracts are used when the project scope is not well-defined. The additional fee and markups can be very costly once totalled at the end of a larger project and it is difficult to extract economies of scale, and economies of advance planning.

  • Pros: Flexibility, encourages contractor performance.
  • Cons: Less cost control, potential for cost overruns.

Unit Price Contracts

The price is based on the unit rates for specific quantities of work. These contracts are suitable for projects with repetitive tasks. They are difficult to apply to professional services and overall project management.

  • Pros: Suitable for projects with repetitive tasks, easy to adjust for changes in scope.
  • Cons: Requires accurate quantity estimates, potential for disputes over measurements.

Incentive Contracts

The contractor is offered incentives for achieving specific performance targets. These contracts align the contractor's goals with the project objectives.

  • Pros: Encourages high performance, aligns contractor's goals with project objectives.
  • Cons: Complex to administer, potential for disputes over performance metrics.

Considerations & Questions

  • What are the key milestones and deliverables of the project?
  • How will resources be allocated and managed?
  • What are the potential risks and how will they be mitigated?
  • What project management methodologies will be used?
  • How will progress be monitored and reported?

Information Required

  • Project scope and objectives.
  • Resource availability and allocation.
  • Risk assessment and mitigation plans.
  • Project schedule and timelines.
  • Stakeholder analysis and communication plan.

Process Steps

  1. Define project scope and objectives.
  2. Develop a detailed project plan, including timelines and milestones.
  3. Allocate resources and assign responsibilities.
  4. Identify potential risks and develop mitigation strategies.
  5. Implement project management methodologies and tools.
  6. Monitor progress and adjust plans as necessary.
  7. Communicate progress to stakeholders regularly.

Quality Requirements

  • Consistency: Ensure all project activities align with the defined objectives and scope.
  • Accuracy: Maintain accurate and up-to-date project documentation.
  • Transparency: Provide clear and regular updates to stakeholders.
  • Adaptability: Be prepared to adjust plans in response to changing circumstances.
click to hide/show details...

Risk Review & Mitigation

The Risk Review & Mitigation section identifies potential risks that could impact the project and outlines strategies to mitigate these risks. This proactive approach helps in minimizing the negative effects on the project's success.

Purpose and Rationale

The purpose of this section is to ensure that all potential risks are identified, assessed, and managed effectively. By doing so, the project team can reduce uncertainties and enhance the likelihood of achieving project objectives.

Considerations & Questions

  • What are the key risks associated with the project?
  • How likely are these risks to occur, and what would be their impact?
  • What mitigation strategies can be implemented to reduce these risks?
  • How will risks be monitored and managed throughout the project?
  • What contingency plans are in place for high-impact risks?

Information Required

  • Risk identification and assessment reports
  • Historical data on similar projects
  • Expert opinions and stakeholder inputs
  • Risk mitigation and contingency plans
  • Regular risk monitoring and review schedules

Process Steps

  1. Identify potential risks through brainstorming and analysis.
  2. Assess the likelihood and impact of each risk.
  3. Develop mitigation strategies for each identified risk.
  4. Implement risk mitigation plans and assign responsibilities.
  5. Monitor risks continuously and update mitigation plans as needed.
  6. Communicate risk status and mitigation efforts to stakeholders regularly.

Quality Requirements

  • Comprehensive: Ensure all potential risks are identified and assessed.
  • Accurate: Use reliable data and expert opinions for risk assessment.
  • Proactive: Develop and implement effective mitigation strategies.
  • Transparent: Maintain clear documentation and communication of risks and mitigation efforts.
click to hide/show details...

Support Strategies

The Support Strategies section outlines the various methods and resources that will be employed to provide ongoing support throughout the project lifecycle. This includes technical support, training, and maintenance plans to ensure the project's success and sustainability.

The following Support Strategies all need to be worked through and cross checked against the Manufacturing Facility design and plans. They may also result in funding requirements which need to be included in the Cost Estimate and Business Case. These are often material and can make or break the business case.

Purpose and Rationale

The purpose of this section is to ensure that adequate support mechanisms are in place to address any issues that may arise during the project. This helps in maintaining project momentum, ensuring smooth operations, and achieving project objectives.

Key Strategies

The following are key strategies that should be developed:

  • Regulatory & Compliance Strategy
  • Sustainability Strategy
  • Logistics Strategies
  • Raw Material Strategy
  • Distribution Strategies
  • Sales & Marketing Strategies
  • Procurement strategy
  • Automation & Technology Strategy
  • Recruitment Strategy
  • Capacity Strategy

Considerations & Questions

  • What types of support will be required during and after the project?
  • How will technical issues be addressed and resolved?
  • What training will be provided to the project team and end-users?
  • How will ongoing maintenance and updates be managed?
  • What resources are available for support, and how can they be accessed?

Information Required

  • Details of technical support services
  • Training plans and schedules
  • Maintenance and update schedules
  • Contact information for support resources
  • Documentation and user manuals

Process Steps

  1. Identify the types of support required for the project.
  2. Develop a detailed support plan, including technical support, training, and maintenance.
  3. Allocate resources and assign responsibilities for support activities.
  4. Implement training programs for the project team and end-users.
  5. Establish a system for tracking and resolving technical issues.
  6. Schedule regular maintenance and updates to ensure smooth operations.
  7. Communicate support plans and resources to all stakeholders.

Quality Requirements

  • Responsiveness: Ensure timely and effective responses to support requests.
  • Comprehensive: Provide thorough training and documentation to minimize support needs.
  • Proactive: Implement regular maintenance and updates to prevent issues.
  • Accessible: Make support resources easily accessible to all stakeholders.